Deploy JupyterHub on CCE
This article explains how to deploy JupyterHub on Cloud Container Engine (CCE) as a multi-user service on Open Telekom Cloud. It focuses on the platform and architectural considerations required to run JupyterHub reliably on Kubernetes, including integration with Open Telekom Cloud services and commonly used components from the open source ecosystem.
JupyterHub is a multi-user platform that provides centralized access to Jupyter Notebooks through a shared infrastructure. It manages user authentication, resource isolation, and lifecycle management, while spawning individual notebook environments for each user. JupyterLab and the classic Jupyter Notebook are the user-facing interfaces that run inside these environments. In practice, JupyterHub acts as the control plane, while JupyterLab or Notebooks are the tools users interact with to write code, analyze data, and document results.
The main advantage of JupyterHub is that it enables teams to use notebooks in a controlled and scalable way. Instead of each user setting up their own environment, JupyterHub provides consistent runtime environments, shared access to data sources, and centralized security and access control. This makes it well suited for Kubernetes-based platforms where compute and storage need to be managed efficiently across multiple users.
JupyterHub is primarily aimed at data scientists, machine learning engineers, researchers, and platform teams that support them. It is commonly used for exploratory data analysis, model development, experimentation, and training, as well as for teaching and collaborative work. When deployed as part of a cloud platform, JupyterHub becomes a foundational service that supports data science and AI workflows without requiring users to manage infrastructure themselves.
Prerequisites
- a Cloud Container Engine (CCE) cluster
- A domain name with DNS management delegated to the Open Telekom Cloud DNS service
- a publicly accessible Keycloak instance
- a bastion host in Elastic Cloud Service (ECS); optional but strongly recommended
We are assuming that you will host Keycloak at keycloak.example.com and JupyterHub at jupyter.example.com. Adjust the URLs accordingly based on your actual domain names.
Creating a CCE Cluster
To proceed with the setup, you'll need to provision a Cloud Container Engine (CCE) cluster. Use the Open Telekom Cloud wizard for cluster creation, and pay close attention to the following configuration specifics:
- High Availability (HA): For this blueprint, a non HA-cluster was used which is not advised for production workloads. However, if your workload demands fault tolerance and availability guarantees, consider enabling HA during creation, as this setting is immutable post-deployment.
- Network Placement: Ensure the CCE cluster is provisioned within the same VPC as the RDS instance to facilitate secure and low-latency communication.
- Subnet Configuration: If you're using a single Subnet for both services, place the CCE worker nodes in the same Subnet as the RDS instance to align with the predefined security group and routing rules.
Decide on the access method you'll use to interact with the CCE cluster post-deployment. There are two main options:
- Assigning an Elastic IP (EIP) and allowing direct access over the public Internet.
- Provisioning a bastion host in a public Subnet within the same VPC, and using it as a secure jump point to reach internal resources.
While the first option is quicker to set up, the recommended approach is to use a bastion host. This method significantly reduces the attack surface by isolating the cluster from direct Internet exposure. The bastion can be tightly locked down with security groups and monitored more easily, aligning with best practices for secure infrastructure access.
Preparing the CCE Cluster
Before deploying our workload, the CCE cluster must be equipped with a set of foundational components. In this section, we'll install and configure essential prerequisites such as the NGINX Ingress Controller for routing external traffic, cert-manager for managing TLS certificates, and other supporting workloads. These components establish the baseline infrastructure required to expose services securely and ensure smooth operation of the application stack within the Kubernetes environment.
Follow the guidelines in the best practice Enabling External Traffic with Ingress & TLS before proceeding to the next steps.
Deploying Keycloak
Configuring Keycloak for JupyterHub provides a centralized and consistent approach to authentication and access control. JupyterHub relies on an external identity provider to manage user identities securely, and Keycloak fulfills this role by acting as the authoritative source for authentication. This avoids local user management within JupyterHub and aligns notebook access with the organization's existing identity and security model. By integrating JupyterHub with Keycloak, user access can be controlled using standard protocols and existing user accounts, which simplifies onboarding and offboarding. It also enables consistent enforcement of security policies across JupyterHub and other platform services. In a Kubernetes-based environment, this approach is essential to operate JupyterHub as a shared service rather than a standalone tool.
If no Keycloak instance is available, it does not have to run in the same cluster as long as it is publicly accessible. You can use the Deploy Keycloak on CCE blueprint to provision a functional Keycloak setup on CCE.
Configuring Keycloak
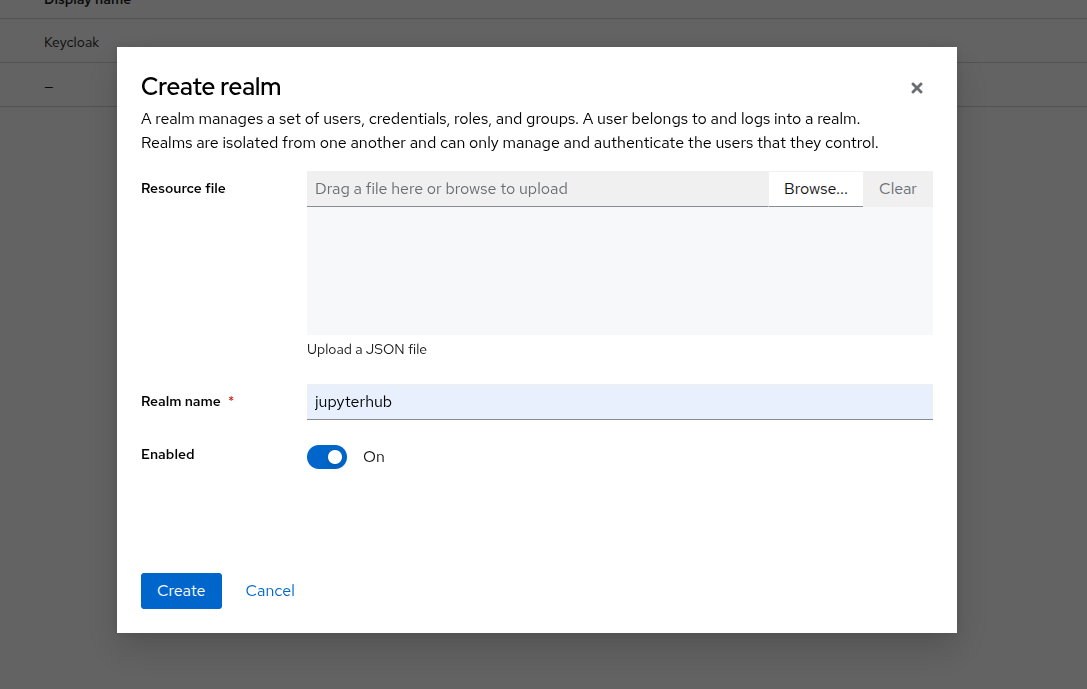
Creating a new Realm
A realm manages users, credentials, roles, and groups. A user belongs to and logs into the realm he is assigned to. Realms are isolated from one another and can manage and authenticate only those users that they belong to them.
Log in to your Keycloak instance and navigate to Manage realms -> Create realm. Create a new realm named jupyterhub and enable it.
Creating a new Client
Clients represent applications or services that request user authentication. Navigate to Clients -> Create client. Create a new client, for example jupyterhub_client, and set
- General Settings -> Client Type: OpenID Connect
- General Settings -> Client ID: You can choose any value, but for consistency in this blueprint, use
jupyterhub_client - Capability config -> Client authentication: ON
- Capability config -> Authentication flow: Standard flow
- Logging settings -> Valid redirect URIs:
https://<JUPYTERHUB_URL>/hub/oauth_callback - Logging settings -> Web origins:
https://<JUPYTERHUB_URL>/
Navigate to the Clients -> jupyterhub_client -> Credentials tab and note down the Client Secret value. You will need it later when configuring JupyterHub Helm Chart values.
| Placeholder Variable | Value |
|---|---|
| KEYCLOAK_JUPYTERHUB_CLIENT_ID | jupyterhub_client |
| KEYCLOAK_JUPYTERHUB_CLIENT_SECRET | Client Secret |
| KEYCLOAK_JUPYTERHUB_REALM | jupyterhub |
| KEYCLOAK_URL | keycloak.example.com |
| JUPYTERHUB_URL | jupyter.example.com |
| JUPYTERHUB_WILDCARD_URL | *.jupyter.example.com |
Adjust the URLs KEYCLOAK_URL and JUPYTERHUB_URL accordingly based on your actual domain names.
Configuring Mappers (Optional)
If you want to include additional user information in the tokens issued to JupyterHub, such as email addresses or group memberships and consequently refine your authorization policies, you can set up mappers in Keycloak.
Navigate to the Clients -> jupyterhub_client -> Client scopes tab. Click on the list item with the name: jupyterhub_client-dedicated:
- Click Add mapper -> From predefined mappers and from the list choose
email, - Click Add mapper -> By Configuration and from the list choose Group Membership. Open the configuration of the mapper. Insert a mapper and token name as
groups. Disable the Full group path option.
Installing JupyterHub using Helm
Design Considerations
Database Backend
Choosing the JupyterHub database backend is a design decision that should be made before installing JupyterHub because it directly affects persistence, recovery behavior, and how the service fits into the wider platform architecture. The JupyterHub database stores critical state such as users, running servers, and authentication data. Changing the database type later usually requires data migration or a redeployment, which can cause downtime and operational complexity. For platform teams, this decision should align with existing standards around stateful services, backup and recovery, and dependency management in the CCE environment.
hub.db.type | Description | Pros | Cons | When to choose it |
|---|---|---|---|---|
sqlite-pvc | SQLite database stored on a persistent volume attached to the Hub pod. | Simple setup, no external database required, minimal operational effort. | Limited database tooling, tied to the lifecycle and reliability of the persistent volume. | Default choice for most Kubernetes deployments where simplicity is preferred and PVs are reliable. |
sqlite-memory | SQLite database kept entirely in memory and lost on Hub restart. | Very fast, zero persistence configuration. | No persistence, Hub state is lost on restart, not suitable for real users. | Short-lived test environments, demos, or CI checks only. |
postgres | External PostgreSQL database configured via a connection URL. | Strong persistence, mature backup and recovery options, fits enterprise DB standards. | Additional dependency, requires database operations and secret management. | Production platforms with PostgreSQL available or requirements for HA, backup, and compliance. |
mysql | External MySQL database configured via a connection URL. | Integrates well where MySQL is already the standard database platform. | Additional dependency and operational overhead similar to PostgreSQL. | Environments where MySQL is the preferred or mandated relational database. |
- In practice,
sqlite-pvcis sufficient for many production JupyterHub deployments on Kubernetes. External databases are typically chosen to meet organizational requirements around database operations, availability, or standardization rather than for functional limitations of SQLite itself. sqlite-memoryis not suitable for any kind of production or staging environment that has to persist user data.- If you choose
postgresormysql, ensure that the CCE cluster has network access to the database service and that appropriate secrets are created to store connection information securely. You need to add an additional security group and associate it with each worker node, alongside any existing security groups. The new rules allow outbound traffic on port5432or3306for PostgreSQL or MySQL respectively, which is required to connect to the RDS instance and ensures reliable communication between JupyterHub and the database backend.
Host User Servers on Individual Subdomains
Hosting user servers on subdomains is an important security and architectural consideration when running JupyterHub as a shared service, especially in multi-user and multi-tenant environments. By default, JupyterHub serves all user notebooks under a single domain using different URL paths. In this model, all user servers share the same browser origin. This means cookies, browser storage, and some client-side security boundaries are shared across users. While this setup is simpler, it increases the blast radius of security issues such as cross-site scripting vulnerabilities in notebooks or extensions.
When user servers are hosted on individual subdomains, each user's notebook server runs under its own browser origin. This creates a strong isolation boundary enforced by the browser itself. Cookies, local storage, and authentication tokens are scoped to a single user's subdomain, significantly reducing the risk that one user's environment can interfere with or access another user's session. From a platform perspective, this aligns well with the principle of least privilege and makes JupyterHub more suitable for untrusted or semi-trusted users.
The main advantage of this approach is improved security isolation. It is particularly relevant for platforms that serve many users, support arbitrary notebook code, or integrate third-party extensions. Subdomains also make OAuth flows and token scoping more explicit and robust, which becomes important when JupyterHub is integrated with external identity providers.
The trade-off is increased operational complexity. Hosting user servers on subdomains requires wildcard DNS records, TLS certificates that cover those subdomains, and corresponding configuration in the Kubernetes ingress or load balancer layer. This adds upfront setup effort and may introduce additional dependencies on DNS and certificate management processes if you don't automate these steps based on the guidelines in the best practices Automate DNS Records Creation from CCE Ingresses with ExternalDNS and Enabling External Traffic with Ingress & TLS.
In practice, hosting user servers on subdomains is recommended for production-grade JupyterHub deployments where security isolation between users matters. For simple, internal, or short-lived setups, the default path-based routing may be sufficient. The decision should be made early, as it influences DNS, ingress, and certificate design for the overall platform.
It is strongly recommended to automate the DNS Records creation. Follow the guidelines in the best practice Automate DNS Records Creation from CCE Ingresses with ExternalDNS before proceeding to the next steps.
If you choose not to automate this step, ensure that the necessary DNS records are created manually to point to the Ingress controller's external IP address.
Preparing Helm Chart Values
- Single User Domain
- Multiple User Subdomains
🚎 Every user's server will be hosted under the same domain: jupyter.example.com/user/<username>
✅ Each user will get a dedicated PVC claim-<username> for their data, if hub.db.type is set to sqlite-pvc
🔐 A DNS record jupyter.example.com and a corresponding TLS certificate.
hub:
  config:
    Authenticator:
      enable_auth_state: true
    GenericOAuthenticator:
      client_id: <KEYCLOAK_JUPYTERHUB_CLIENT_ID>
      client_secret: <KEYCLOAK_JUPYTERHUB_CLIENT_SECRET>
      oauth_callback_url: https://<JUPYTERHUB_URL>/hub/oauth_callback
      authorize_url: https://<KEYCLOAK_URL>/realms/<KEYCLOAK_JUPYTERHUB_REALM>/protocol/openid-connect/auth
      token_url: https://<KEYCLOAK_URL>/realms/<KEYCLOAK_JUPYTERHUB_REALM>/protocol/openid-connect/token
      userdata_url: https://<KEYCLOAK_URL>/realms/<KEYCLOAK_JUPYTERHUB_REALM>/protocol/openid-connect/userinfo
      login_service: keycloak
      username_claim: preferred_username
      scope:
        - openid
        - profile
        - email
      allow_all: true
      admin_users:
        - admin
    JupyterHub:
      authenticator_class: generic-oauth
      trust_xheaders: true
  db:
    pvc:
      storageClassName: csi-disk
  extraConfig:
    00-forwarded-headers-and-cookies: |
      c.JupyterHub.trust_xheaders = True
      c.JupyterHub.cookie_options = {
        "SameSite": "None",
        "Secure": True,
        "Path": "/",
      }
      c.JupyterHub.tornado_settings = {
        "xheaders": True,
        "cookie_options": {
          "SameSite": "None",
          "Secure": True,
          "Path": "/",
        },
      }
proxy:
  service:
    type: NodePort
ingress:
  enabled: true
  annotations:
    cert-manager.io/cluster-issuer: opentelekomcloud-letsencrypt
  ingressClassName: nginx
  pathType: Prefix
  hosts:
    - <JUPYTERHUB_URL>
  tls:
    - hosts:
        - <JUPYTERHUB_URL>
      secretName: jupyterhub-tls
🛵 Every user's server will be hosted under its own subdomain: <username>.jupyter.example.com
✅ Each user will get a dedicated PVC claim-<username> for their data, if hub.db.type is set to sqlite-pvc
🔐 A wildcard DNS record *.jupyter.example.com and a corresponding wildcard TLS certificate.
hub:
  config:
    Authenticator:
      enable_auth_state: true
    GenericOAuthenticator:
      client_id: <KEYCLOAK_JUPYTERHUB_CLIENT_ID>
      client_secret: <KEYCLOAK_JUPYTERHUB_CLIENT_SECRET>
      oauth_callback_url: https://<JUPYTERHUB_URL>/hub/oauth_callback
      authorize_url: https://<KEYCLOAK_URL>/realms/<KEYCLOAK_JUPYTERHUB_REALM>/protocol/openid-connect/auth
      token_url: https://<KEYCLOAK_URL>/realms/<KEYCLOAK_JUPYTERHUB_REALM>/protocol/openid-connect/token
      userdata_url: https://<KEYCLOAK_URL>/realms/<KEYCLOAK_JUPYTERHUB_REALM>/protocol/openid-connect/userinfo
      login_service: keycloak
      username_claim: preferred_username
      scope:
        - openid
        - profile
        - email
      allow_all: true
      admin_users:
        - admin
    JupyterHub:
      authenticator_class: generic-oauth
      trust_xheaders: true
      subdomain_host: <JUPYTERHUB_URL>
  db:
    pvc:
      storageClassName: csi-disk
  extraConfig:
    00-forwarded-headers-and-cookies: |
      c.JupyterHub.trust_xheaders = True
      c.JupyterHub.cookie_options = {
        "SameSite": "None",
        "Secure": True,
        "Path": "/",
      }
      c.JupyterHub.tornado_settings = {
        "xheaders": True,
        "cookie_options": {
          "SameSite": "None",
          "Secure": True,
          "Path": "/",
        },
      }
proxy:
  service:
    type: NodePort
ingress:
  enabled: true
  annotations:
    cert-manager.io/cluster-issuer: opentelekomcloud-letsencrypt
  ingressClassName: nginx
  pathType: Prefix
  hosts:
    - <JUPYTERHUB_URL>
    - "<JUPYTERHUB_WILDCARD_URL>"
  tls:
    - hosts:
        - <JUPYTERHUB_URL>
        - "<JUPYTERHUB_WILDCARD_URL>"
      secretName: jupyterhub-wildcard-tls
Replace the placeholder variables in the above YAML snippets with the actual values you noted down earlier.
Installing Helm Chart
helm repo add jupyterhub https://hub.jupyter.org/helm-chart/
helm repo update

helm upgrade --cleanup-on-fail \
  --install jupyterhub jupyterhub/jupyterhub \
  --namespace jupyterhub \
  --create-namespace \
  --values overrides.yaml
Verification
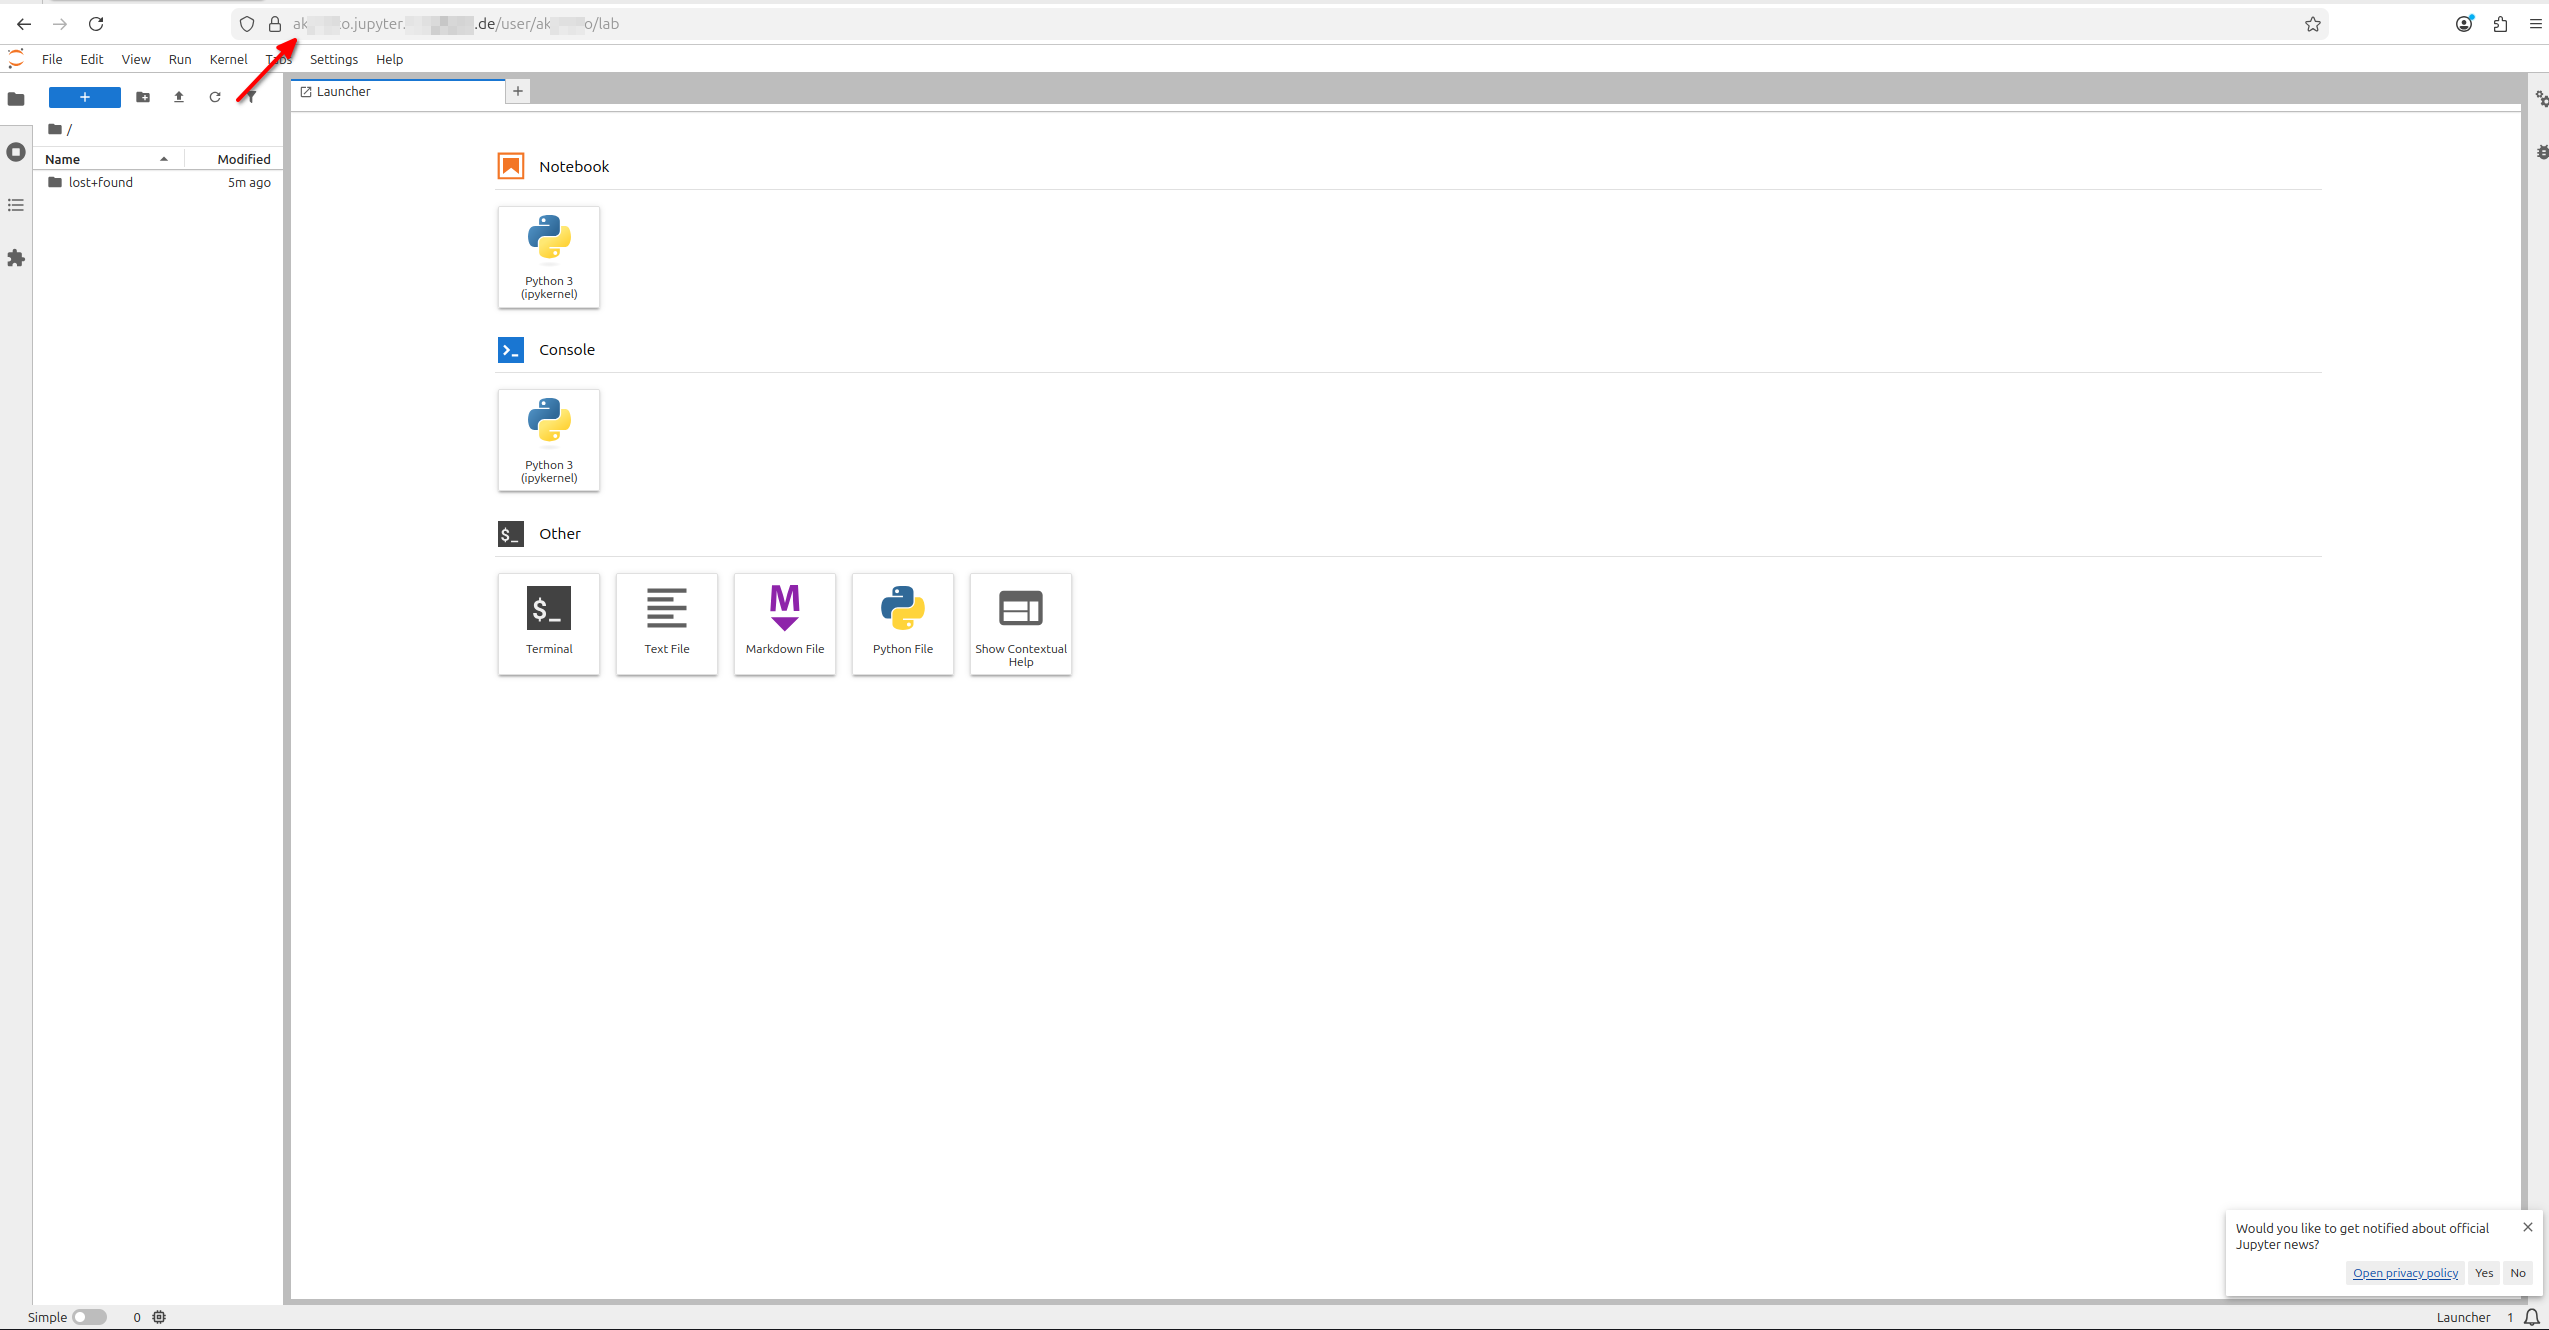
Give it a couple of minutes for the TLS certificate to be issued and the Ingress to be fully operational. Then, navigate to https://<JUPYTERHUB_URL>/ in your web browser. You should see the JupyterHub login page with an option to log in via Keycloak. Use the credentials of a user that exists in the Keycloak realm you configured earlier. After logging in, you should be directed to your JupyterHub dashboard, where you can start a new JupyterLab or Notebook server.
- Single User Domain
- Multiple User Subdomains