Deploy Dokploy on ECS
The first part of the blueprint explains how to deploy a highly available Dokploy platform on a fleet of Elastic Cloud Servers (ECS). It covers the configuration of the required Open Telekom Cloud services, including VPC, NAT Gateway, Elastic Load Balancer, RDS, and DCS, as well as the setup of the core Dokploy components such as the backend, frontend, and the Traefik ingress controller.
Creating VPC and Subnets
Go to Open Telekom Cloud Console -> Network Console -> Virtual Private Cloud and click Create VPC. Create a VPC (let's call it for the rest of this lab vpc-dokploy) with the IPv4 CIDR block 10.199.0.0/16, and define three subnets:
10.199.10.0/24: for connectivity components (NATGW, ELB and bastion host)10.199.11.0/24: for Swarm nodes10.199.12.0/24: for RDS and DCS instances
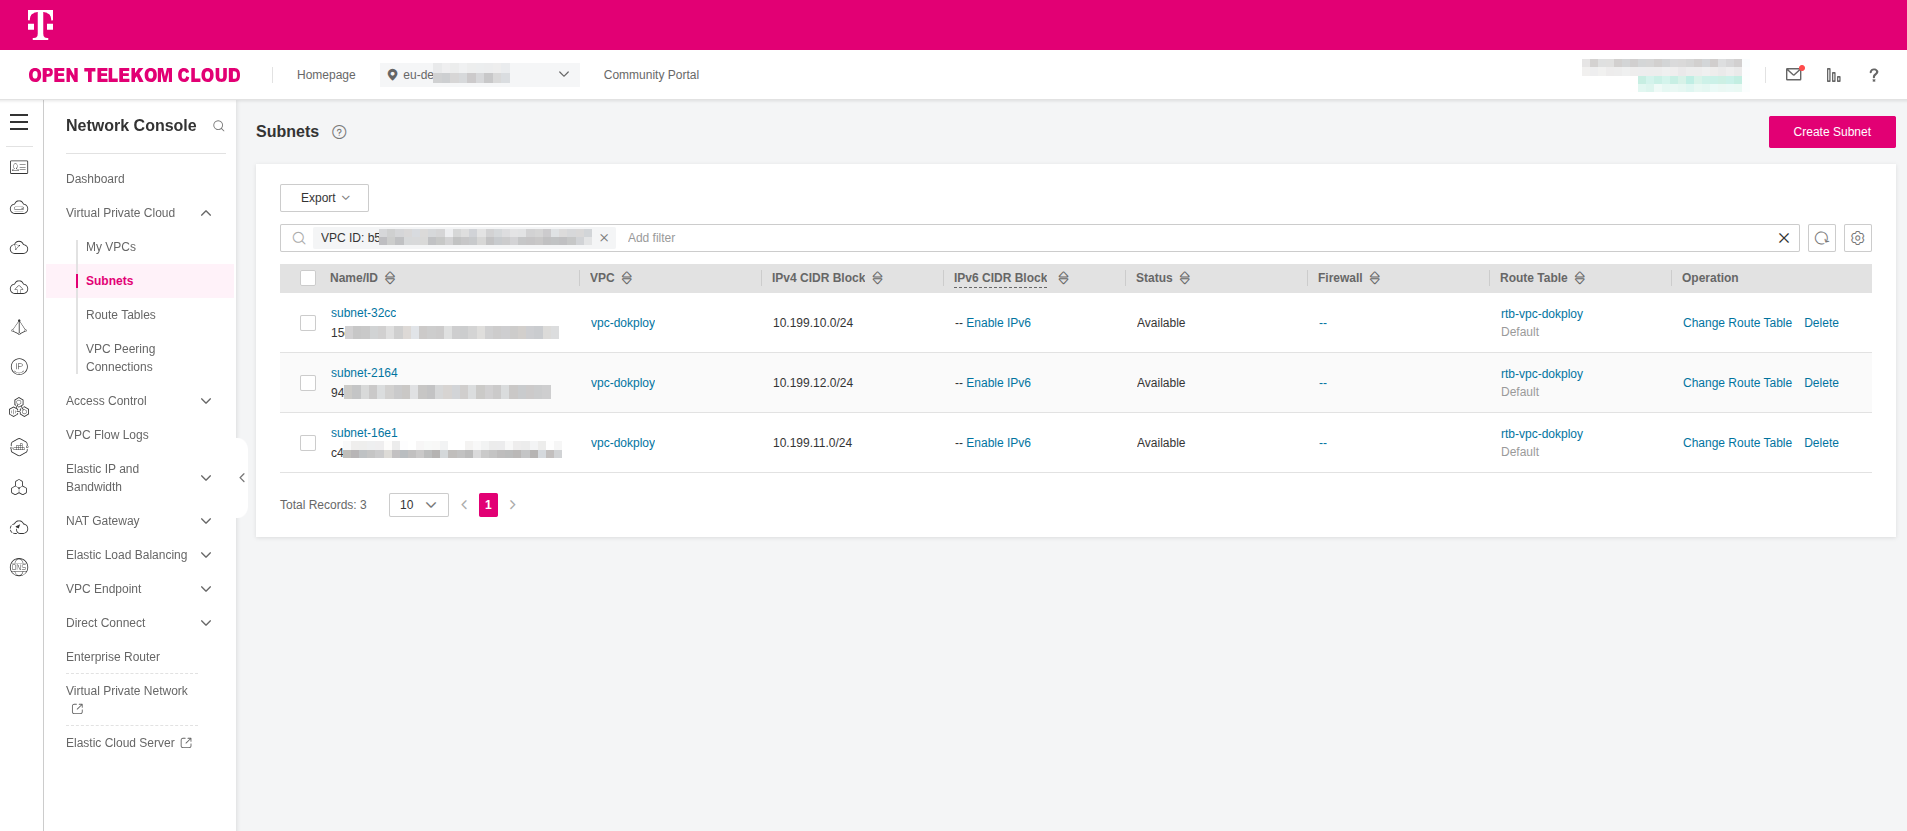
You may choose any IP address range that fits your environment, provided the VPC is allocated a /16 network.
Creating a PostgreSQL Database
-
Go to Open Telekom Cloud Console -> Relational Database Service and click Create DB Instance. Name the instance
rds-dokployand configure it with the following settings:- DB Engine:
PostgreSQL - DB Engine Version:
17 - DB Instance Type:
Primary/Standby - Primary AZ:
eu-de-01 - Standby AZ:
eu-de-02 - Instance Class:
Dedicated - Storage Space:
150GB(you can scale later according to your needs) - VPC:
vpc-dokployand Subnet:10.199.12.0/24
Finally provide a password for root and click Create Now -> Submit:
tipYou can create a strong, secure, random password of your choice with, e.g.:
openssl rand -base64 32 - DB Engine:
Creating a Redis Instance
Go to Open Telekom Cloud Console -> Distributed Cache Service and click Create DCS Instance. Name the instance dcs-dokploy and configure it with the following settings:
- Instance Type:
Master/Standby - Replicas:
2 - Primary AZ:
eu-de-01 - Standby AZ:
eu-de-02 - Instance Specification:
redis.ha.xu1.large.r2.2 - VPC:
vpc-dokployand Subnet:10.199.12.0/24 - Password Protected:
No
Preparing Security Groups
Go to Open Telekom Cloud Console -> Network Console -> Access Control -> Security Groups and click Create Security Group:
You must provision Security Groups for all of the above (RDS, SSH, and Dokploy); all of them are required.
- RDS (Instances/Clients)
- SSH (Bastion)
- Dokploy (Bundle)
Configure the required Security Groups as outlined in Configure Security Groups for PostgreSQL RDS Instances and Clients. After the RDS instance has been created, update its configuration to use the rds-dokploy-instances Security Group instead of the default one.

In this setup, ensure the inbound rule for rds-dokploy-instances allows traffic from 10.199.0.0/16 (the whole VPC),
and the outbound rule of rds-dokploy-clients permits traffic to 10.199.12.0/24 (the subnet where the RDS instances reside).
Name the Security Group ssh-dokploy and add an inbound rule to allow TCP/22 traffic from 0.0.0.0/0.
For improved security, restrict the source to a defined IP range instead of open access.
Name the Security Group ecs-dokploy and add the following inbound rules:
| Type | Protocol | Port | Source | Description |
|---|---|---|---|---|
| IPv4 | UDP | 7946 | 10.199.11.0/24 | Allow Docker Swarm UDP Gossip |
| IPv4 | TCP | 7946 | 10.199.11.0/24 | Allow Docker Swarm TCP Gossip |
| IPv4 | UDP | 4789 | 10.199.11.0/24 | Allow Docker Swarm Overlay |
| IPv4 | TCP | 2377 | 10.199.11.0/24 | Allow Docker Swarm Manager |
| IPv4 | TCP | 80 | 0.0.0.0/0 | Allow Dokploy Traefik HTTP |
| IPv4 | TCP | 443 | 0.0.0.0/0 | Allow Dokploy Traefik HTTPS |
| IPv4 | TCP | 22 | 10.199.10.0/24 | Allow SSH from Bastion Subnet |
2377/TCP: Cluster management traffic (Required for Swarm Management). Only needed on manager nodes. Used fordocker swarm initanddocker swarm joincommands. Without it, worker nodes can't join the swarm.7946/TCP+UDP: Node discovery/gossip (Required for Swarm Node Discovery & Gossip). Required on all nodes (manager + worker). Used by the Serf gossip protocol for cluster membership and health status.4789/UDP: VXLAN overlay networking (Required for Overlay Networks). Required on all nodes (manager + worker) if you use overlay networks. Needed for inter-container networking across different Docker hosts.
Preparing Compute & Storage
Creating an ECS Group
Go to Open Telekom Cloud Console -> Elastic Cloud Server -> ECS Group and click Create ECS Group.
Name the group svrgrp-dokploy and configure it with Anti-Affinity policy and click OK.
An ECS group enables up to 16 ECSs in this group to be created on different hosts to improve service reliability.
Creating a Key Pair
Go to Open Telekom Cloud Console -> Elastic Cloud Server -> Network & Security -> Key Pair and click Create Key Pair. Name it KeyPair-Dokploy and click OK. A file named Keypair-Dokploy.pem will be automatically downloaded to your machine.
Save the file in ~/.ssh on your workstation and keep it secure, as it will be needed to access both the Swarm nodes and the bastion host later.
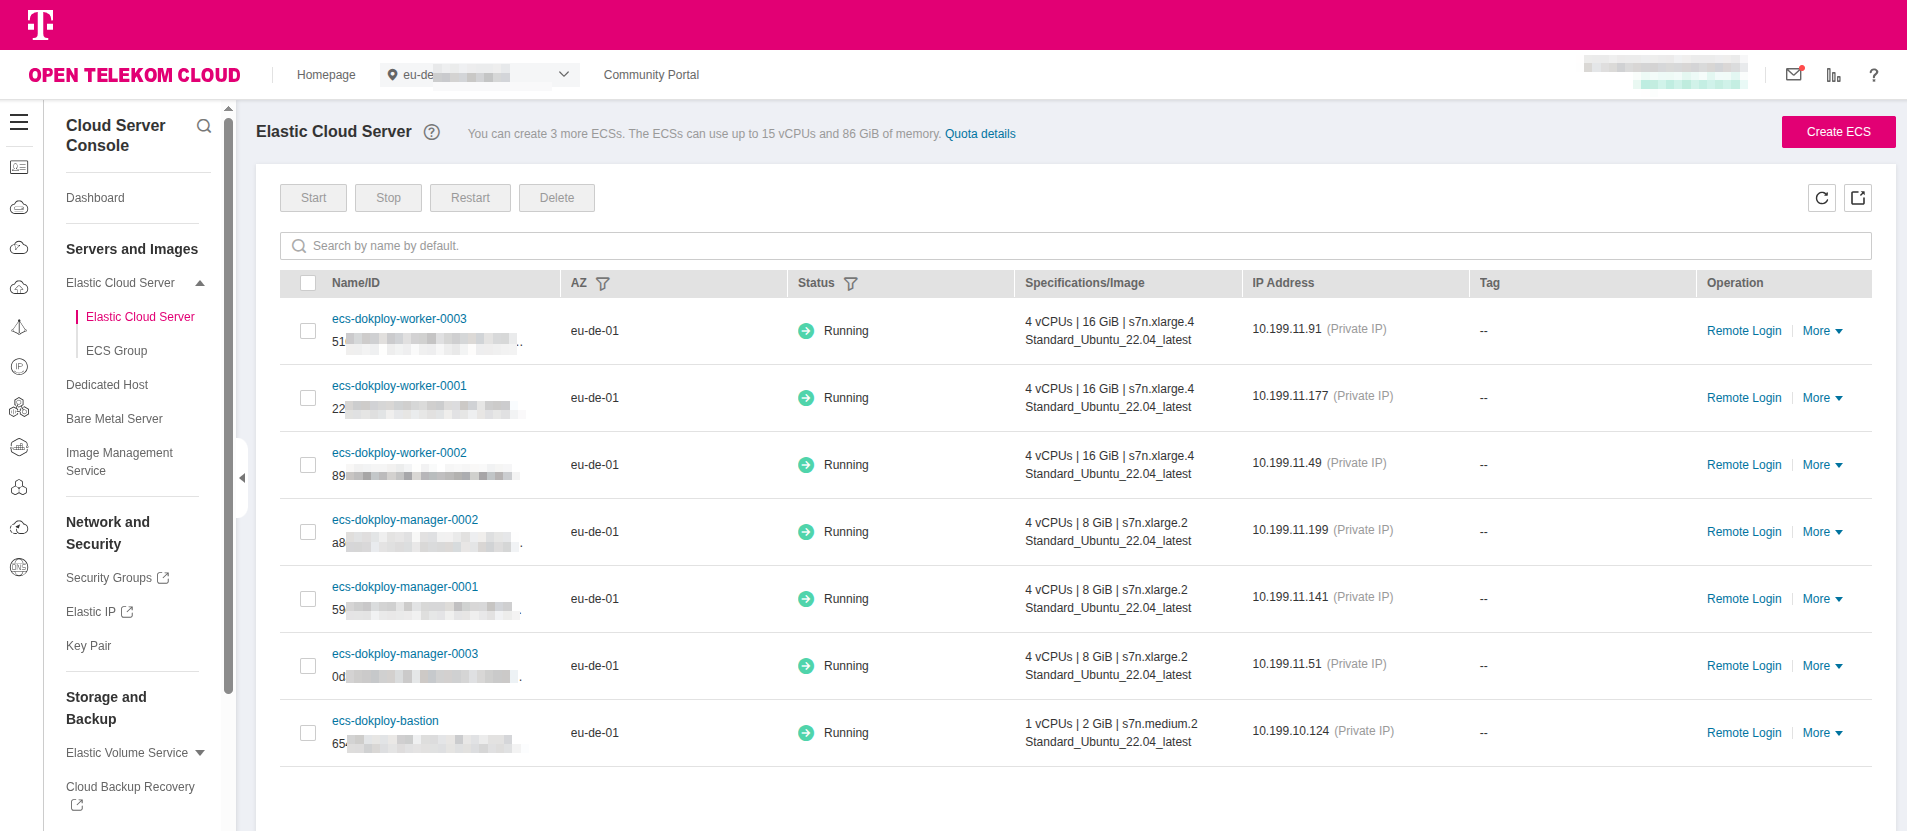
Creating Nodes
- Master Nodes
- Worker Nodes
- Bastion Node
Go to Open Telekom Cloud Console -> Elastic Cloud Server and click Create ECS and configure it with the following settings:
- AZ:
Random - Multi-AZ Deployment: ✅
- Flavor:
s7n.xlarge.2 - Image:
Ubuntu, Standard_Ubuntu_22.04_latest(6 GiB) - System Disk:
General Purpose SSD,100GiB - VPC:
vpc-dokployand Subnet:10.199.11.0/24 - Security Groups: add
rds-dokploy-clientsandecs-dokployadditionally todefault. - ECS Name:
ecs-dokploy-manager - Key Pair:
KeyPair-Dokploy - ECS Group:
srvgrp-dokploy - Quantity:
3
and click Confirm -> Create Now.
Go to Open Telekom Cloud Console -> Elastic Cloud Server and click Create ECS and configure it with the following settings:
- AZ:
Random - Multi-AZ Deployment: ✅
- Flavor:
s7n.xlarge.4 - Image:
Ubuntu, Standard_Ubuntu_22.04_latest(6 GiB) - System Disk:
General Purpose SSD,100GiB - VPC:
vpc-dokployand Subnet:10.199.11.0/24 - Security Groups: add
rds-dokploy-clientsandecs-dokployadditionally todefault. - ECS Name:
ecs-dokploy-worker - Key Pair:
KeyPair-Dokploy - ECS Group:
srvgrp-dokploy - Quantity:
3
and click Confirm -> Create Now.
Go to Open Telekom Cloud Console -> Elastic Cloud Server and click Create ECS and configure it with the following settings:
- AZ:
Random - Flavor:
s7n.medium.2 - Image:
Ubuntu, Standard_Ubuntu_22.04_latest(6 GiB) - System Disk:
General Purpose SSD,40GiB - VPC:
vpc-dokployand Subnet:10.199.10.0/24 - Security Groups: add
rds-dokploy-clientsandssh-dokployadditionally todefault. - ECS Name:
ecs-dokploy-bastion - Key Pair:
KeyPair-Dokploy - Quantity:
1
and click Confirm -> Create Now.
Deploy all seven(7) ECS instances and carefully verify that each instance is assigned to the correct subnet.
Creating an SFS Turbo File System
Go to Open Telekom Cloud Console -> Scalable File System -> SFS Turbo -> File Systems and click Create File System.
Name the instance sfs-turbo-dokploy and configure it with the following settings, and click Create Now -> Submit:
- Type:
Standard(Old Generation) - Capacity:
500GB - VPC:
vpc-dokployand Subnet:10.199.11.0/24
You need the SFS Turbo share because anything you bind-mount into a Swarm service must exist identically on every node where that task might land, and local Docker volumes are node-scoped. In our design the control-plane services (Traefik, Dokploy, Portainer) run on any manager; during updates or failover Swarm can relocate a replica to a different manager. If a service relies on a host path such as /etc/traefik/traefik.yml, /etc/dokploy, or persistent UI data, that path must contain the same bytes on every manager or the task will be rejected or start with divergent configuration. Mounting a single NFSv4 export from SFS Turbo at the same mountpoint on each manager gives you a shared POSIX filesystem with consistent paths and semantics, so the bind mounts resolve everywhere, the configuration becomes a single source of truth, and rescheduling doesn't break because bind source path might not exist or because of stale files.
This matters for more than configuration. If you keep Portainer or Dokploy state on a node-local volume, you either have to pin the service to that node forever or accept losing state on failover. With SFS Turbo you move that state onto network storage that all managers can read and write, so you can keep replicas movable and still preserve data. It also gives you a neutral place to store artifacts that multiple containers need at once; Traefik dynamic files, bootstrap templates, backup snapshots, build caches without inventing your own replication. Because SFS Turbo is a managed, high-throughput NFS service inside the VPC, you get low latency from every ECS, consistent locking and file permissions, and durability features such as snapshots; operationally it's much simpler and safer than trying to mirror directories across nodes or relying on ad-hoc rsync jobs. In short, the share decouples service scheduling from host persistence: Swarm can freely reschedule managers, and your control-plane services still find their config and data exactly where they expect it.
Creating an OBS Bucket
Go to Open Telekom Cloud Console -> Object Storage Service -> Object Storage and click Create Bucket.
Name the instance obs-dokploy and configure it with the following settings, and click Create Now:
- Region: the same region as you've already chosen to run this lab
- Storage Class:
Standard - Bucket Policies:
Private
Dokploy needs an object store because it is not just a control plane; it orchestrates full application lifecycles, including builds, deployments, backups, and artifacts. A relational database and a key-value store are fine for state and coordination, but they are not suitable for storing container images, large build outputs, tarballs, or user-generated assets. Those files have to live in a storage system that can handle unbounded growth, is durable by design, and can be addressed consistently no matter where a container runs.
When Dokploy builds an application from source or exports a backup, it stages artifacts in object storage and later fetches them back for deployment. This indirection allows workloads to be moved between Swarm nodes without having to replicate gigabytes of data across managers. Using an OBS bucket also integrates neatly with Dokploy's workflow for volume backups: instead of keeping snapshots on ephemeral node disks, backups are written once to OBS, where they are durable, versioned if you enable it, and available to restore on any new cluster.
Another important reason is compatibility. Dokploy assumes an S3 endpoint for its storage backend, which means it can treat local deployments and cloud deployments the same way. By giving it an OBS bucket, you satisfy that contract with an API that looks like AWS S3 but lives entirely in Open Telekom Cloud, taking advantage of built-in durability and regional replication. This reduces operational burden compared to stitching together your own distributed file service for large objects.
In practice the OBS bucket becomes the persistent layer for Dokploy's heavy binary data, while Postgres tracks metadata and Redis accelerates queries. Together, those three backends give Dokploy all the persistence primitives it needs: structured state, ephemeral cache, and durable object storage.
Creating a NAT Gateway
Go to Open Telekom Cloud Console -> Network Console -> NAT Gateway -> Public NAT Gateways and click Create Public NAT Gateway. Call it nat-dokploy and assign
it to the vpc-dokploy VPC and place it in the subnet 10.199.10.0/24. Set Specifications to Small and click Create Now.
Skip adding rules at this stage; we will configure them later.
Configurating SNAT & DNAT Rules
-
Go to Open Telekom Cloud Console -> Network Console -> Elastic IP & Bandwidth -> EIPs and click Assign EIP. Name it
eip-natgw-dokployand configure it with the following settings, and click Create Now -> Submit:- EIP Type:
Dynamic BGP - Billed By:
Dedicated - Bandwidth (Mbit/s):
50(that is an indicative value, adjust according to your needs)
- EIP Type:
-
Go to Open Telekom Cloud Console -> Network Console -> NAT Gateway -> Public NAT Gateways and select the NAT gateway you created earlier.
-
Click SNAT Rules -> Add SNAT Rule select the EIP you created earlier (eip-natgw-dokploy) and click OK.
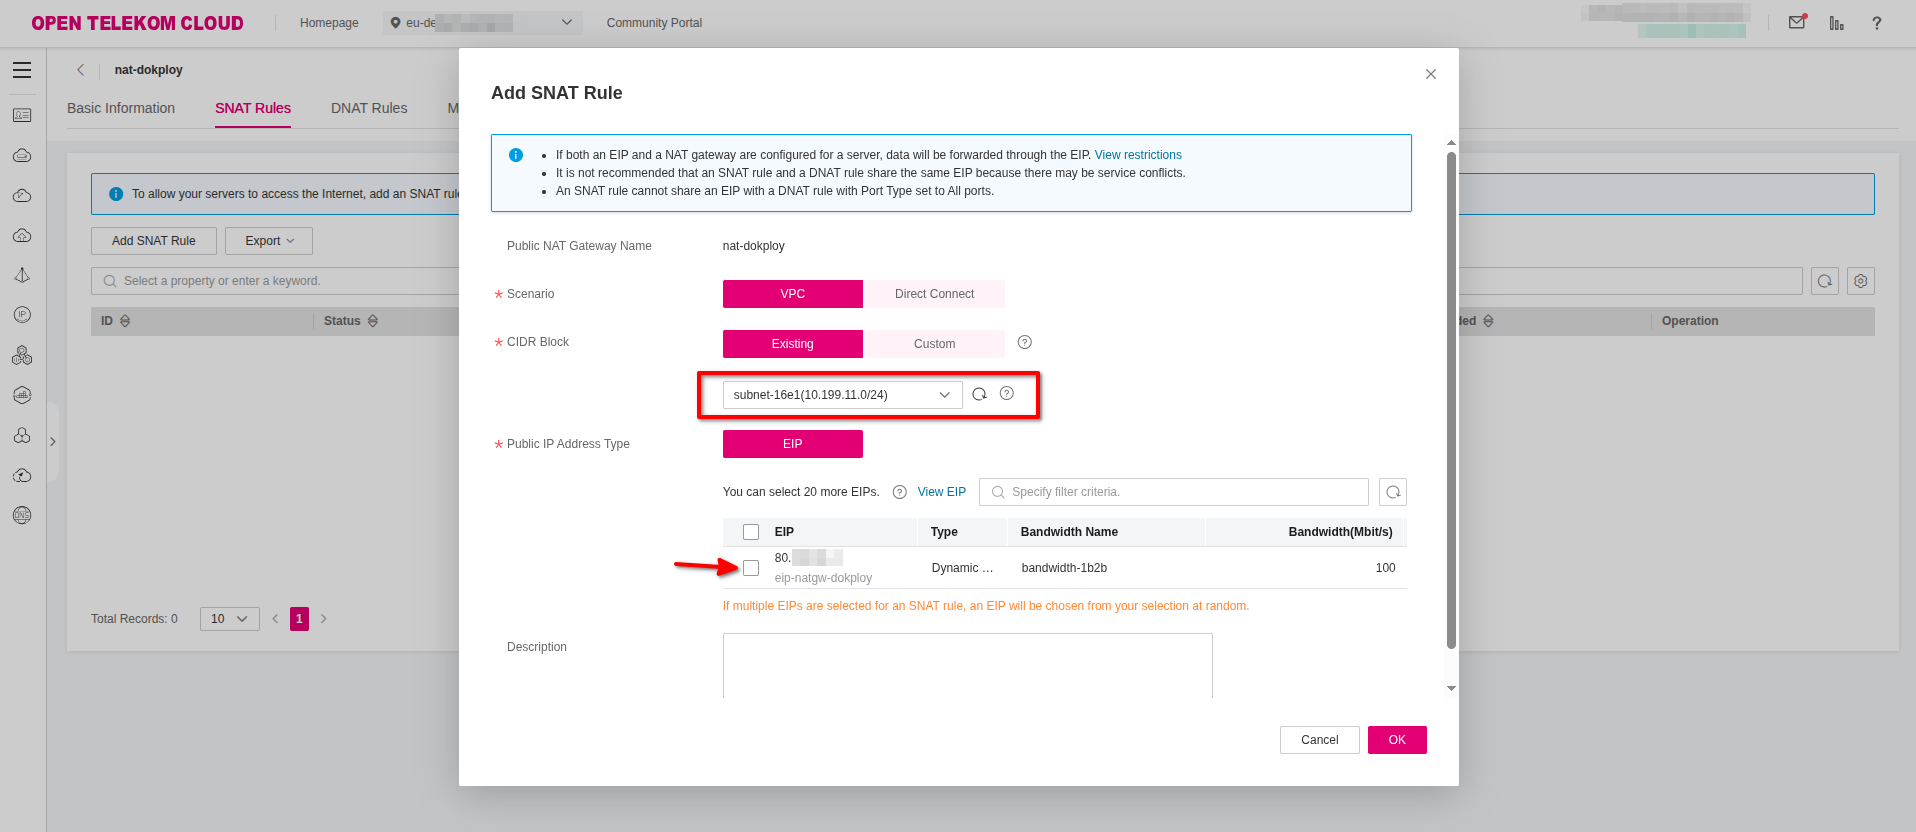 important
Repeat this step for each subnet in vpc-dokploy.
-
Click DNAT Rules -> Add DNAT Rule and configure it with the following settings:
- Scenario:
VPC - Port Type:
Specific Port - Protocol:
TCP - Public IP Address Type:
EIPand select from the list the EIP you created earlier. - Outside Port:
2200 - Instance Type:
Serverand selectecs-dokploy-bastionfrom the list. - Inside Port:
22
and click OK.
- Scenario:
Creating an Elastic Load Balancer
Go to Open Telekom Cloud Console -> Network Console -> Elastic Load Balancing and click Create Elastic Load Balancer. Name the instance elb-dokploy
and configure it with the following settings, and click Create Now -> Submit:
- Type:
Dedicated - AZ: select all the available options
- Enable both Application and Network Load Balancing (choose the specs that fit more to your needs)
- VPC:
vpc-dokploy - Frontend Subnet:
10.199.10.0/24 - Backend Subnet:
10.199.11.0/24 - EIP: select New IP
- Bandwidth:
300Mbit/s
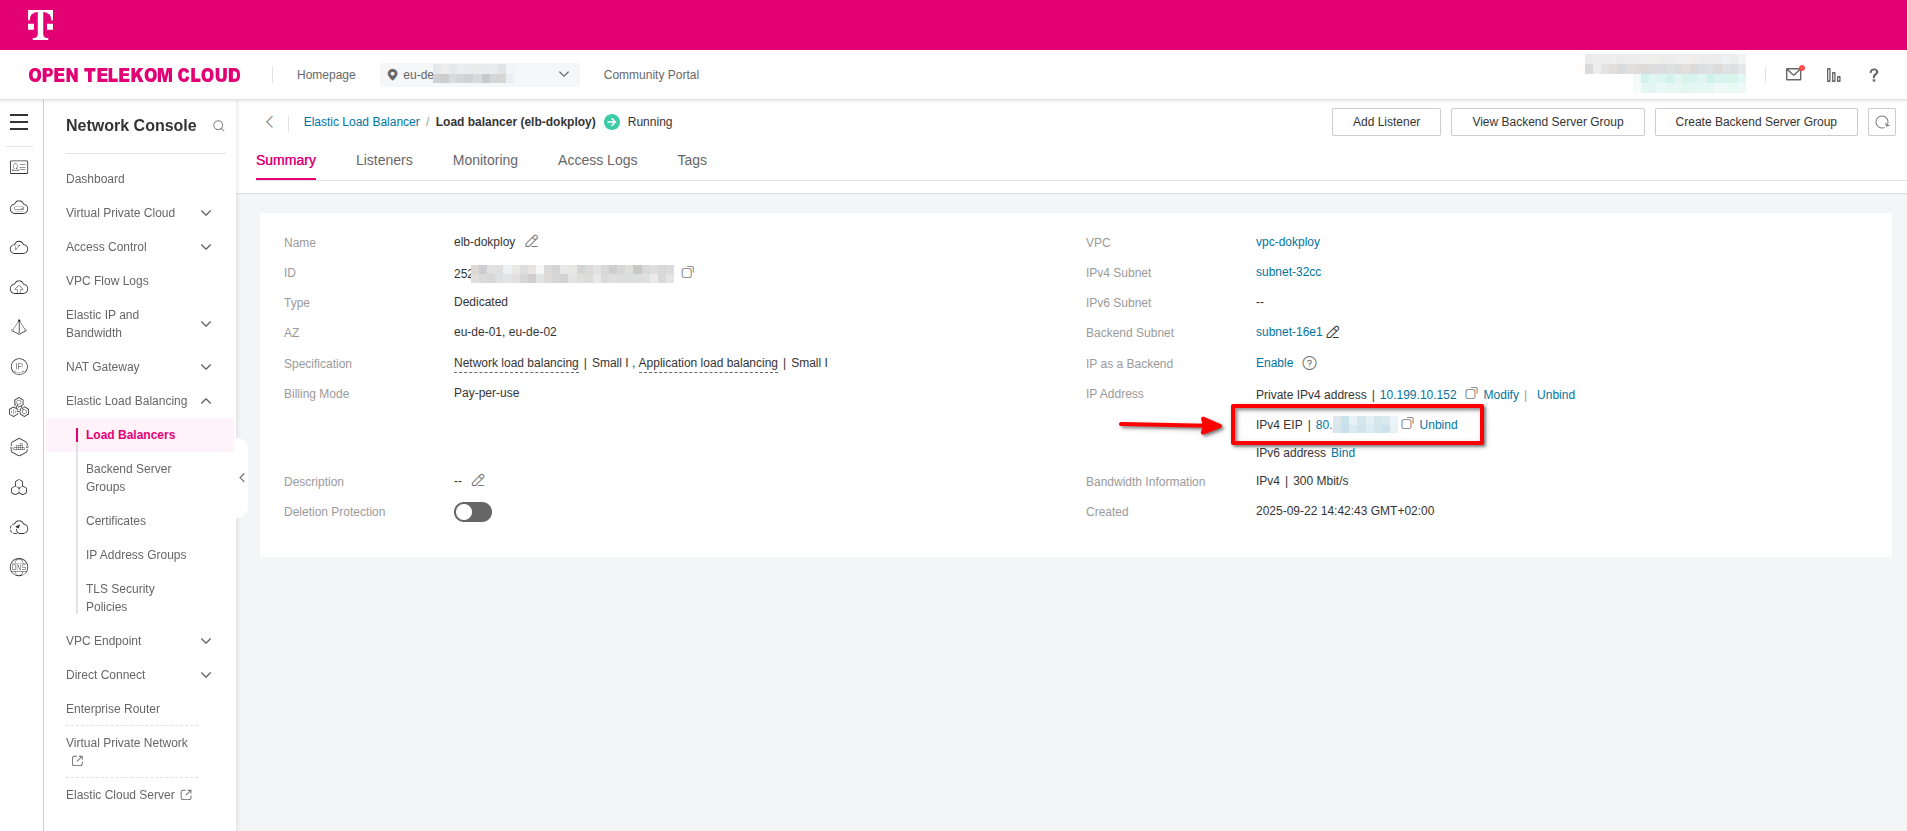
Make a note of the EIP of the load balancer, as it will be required in the next steps when creating the necessary DNS records.
Creating DNS Records
You must delegate the management of your domain's NS records to the Open Telekom Cloud Domain Name Service. At your domain registrar, configure the following:
- Disable any dynamic DNS service for the domain or for the subdomain you plan to use with Dokploy.
- Update the NS records of your domain to point to
ns1.open-telekom-cloud.comandns2.open-telekom-cloud.com.
Once these changes are in place, you can proceed to create a new DNS Public Zone and the required record sets for your domain in Open Telekom Cloud.
If delegating domain management to Open Telekom Cloud DNS is not an option, you will need to apply the following steps in your existing DNS service (for example, at your registrar or through Cloudflare).
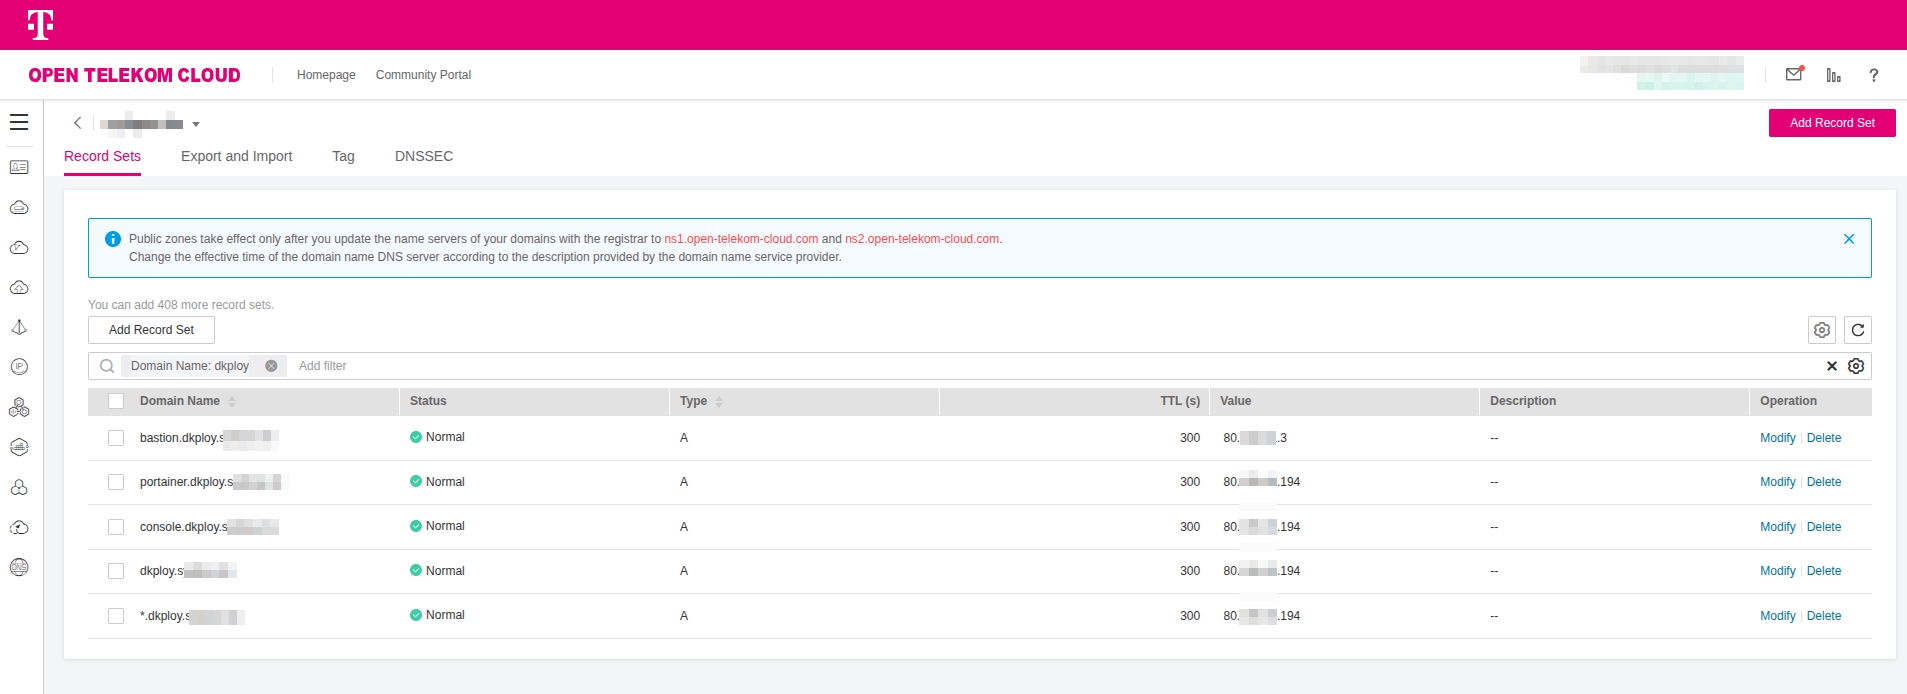
Go to Open Telekom Cloud Console -> Domain Name Service -> Public Zones and select the zone corresponding to the domain through which you will expose Dokploy and the workloads hosted on it. Create the following A Records by clicking Add Record Set:
| Domain | Type | TTL (s) | Value | Description |
|---|---|---|---|---|
| *.dokploy.example.com | A | 300 | EIP_ELB | Wildcard record for all applications exposed through Dokploy via the ELB |
| dokploy.example.com | A | 300 | EIP_ELB | Root domain pointing to the ELB, reserved for future use or redirects |
| console.dokploy.example.com | A | 300 | EIP_ELB | Dokploy management console routed through the ELB |
| bastion.dokploy.example.com | A | 300 | EIP_NATGW | Bastion host used for administrative SSH access to the Swarm cluster |
| portainer.dokploy.example.com | A | 300 | EIP_ELB | Portainer UI for Swarm management, exposed through the ELB (Optional) |
Replace EIP_ELB and EIP_NATGW with the actual Elastic IP addresses assigned to the load balancer and the NAT gateway.
Creating the Swarm
-
Use a tool such as dig or doggo to verify that the bastion host domain resolves to the Elastic IP address of the NAT gateway:
- dig
- doggo
dig (Domain Information Groper) is a widely used command-line DNS client included in most Unix-like systems. It is commonly used for troubleshooting and verifying DNS records, providing detailed output about queries and responses. dig supports multiple query types and options, making it a standard tool for administrators to inspect domain resolution and DNS server behavior.
sudo apt update
sudo apt install dnsutils

dig +short bastion.dokploy.example.com
doggo is a modern command-line DNS client, similar to dig, developed in Go. It provides clear and concise output and supports additional protocols such as DoH, DoT, DoQ, and DNSCrypt.
curl -sS https://raw.githubusercontent.com/mr-karan/doggo/main/install.sh | sh

doggo bastion.dokplay.example.com -
Copy the KeyPair we created previously to the bastion host:
chmod 400 ~/.ssh/KeyPair-Dokploy.pem
scp -i ~/.ssh/KeyPair-Dokploy.pem -P 2200 ~/.ssh/KeyPair-Dokploy.pem ubuntu@bastion.dokploy.example.com:/home/ubuntu/.ssh -
Connect to the bastion host using SSH:
ssh -i ~/.ssh/KeyPair-Dokploy.pem -p 2200 ubuntu@bastion.dokploy.example.comand from the bastion host, connect in sequence to each manager node, e.g.:
ssh -i ~/.ssh/KeyPair-Dokploy.pem 10.199.11.xxx -
Deploy Docker and various utilities on every node:
# basic packages
sudo apt-get update -y && sudo apt-get install -y ca-certificates curl gnupg nfs-common

# docker
curl -sSL https://get.docker.com | sh

sudo groupadd docker
sudo usermod -aG docker $USER
newgrp docker -
From the bastion host, connect to the first manager node using its private IP address:
ssh -i ~/.ssh/KeyPair-Dokploy.pem 10.199.11.141criticalReplace
10.199.11.141with the private IP address of the first manager node in your environment. -
Initialize the Docker Swarm:
PRIVATE_IP=$(ip -4 addr show ens3 | awk '/inet /{print $2}' | cut -d/ -f1)
docker swarm init --advertise-addr "$PRIVATE_IP"
If the initialization completes successfully, a message similar to the following will appear:
Swarm initialized: current node (096mm1ulpf7u0frrme514t99z) is now a manager.

To add a **worker** to this swarm, run the following command:

    docker swarm join --token SWMTKN-1-6bqpqrh7ztq5u5y465kvvbyjodxzzekrxzyofymt5al4jpx1e7-a0uwmu7mfdrqdne0iyqs65brz 10.199.11.141:2377

To add a **manager** to this swarm, run 'docker swarm join-token manager' and follow the instructions.
Run the command provided in the response to add a manager to the swarm. You should then see a message similar to the following:
docker swarm join --token SWMTKN-1-6bqpqrh7ztq5u5y465kvvbyjodxzzekrxzyofymt5al4jpx1e7-0xfr1nmmigpsqo1mowkdxpg6s 10.199.11.141:2377criticalNote down the two join-token commands that are generated, one for managers and one for workers, and ensure they are not mixed up when applied to the respective nodes during the next steps.
-
Create an overlay network on the first manager:
docker network create --driver overlay --attachable dokploy-networkinfoYou need to create the network once. Swarm then ensures that any node which runs a service attached to that network gets a local dataplane endpoint automatically.
-
From the bastion host, connect to each node and run the appropriate join command based on its assigned role in the swarm.
-
From the bastion host, connect to each node and mount the SFS Turbo share (including the bastion):
sudo mkdir -p /mnt/sfs_turbo
echo "10.199.11.11:/ /mnt/sfs_turbo nfs vers=3,nolock,noresvport,proto=tcp,rsize=1048576,wsize=1048576,timeo=600,retrans=2,hard,_netdev,x-systemd.automount,bg,nofail 0 0" | sudo tee -a /etc/fstab
sudo mount -acriticalReplace
10.199.11.11with the private IP address of the SFS Turbo share in your environment.
Deploying Traefik
Deploying Traefik as a Global Service
Connect to any manager node (preferrably the first) and create a file named traefik.yml in the /mnt/sfs_turbo directory:
Replace 10.199.0.0/16 with the CIDR block of your VPC.
entryPoints:
  web:
    address: ":80"
    forwardedHeaders:
      insecure: false
      trustedIPs:
        - 10.199.0.0/16
        - 100.64.0.0/10
    transport:
      respondingTimeouts:
        readTimeout: 0
        writeTimeout: 0
        idleTimeout: 180s
      lifeCycle:
        graceTimeOut: 15s

ping:
  entryPoint: web

api:
  dashboard: false

providers:
  docker:
    swarmMode: true
    watch: true
    exposedByDefault: false
    network: dokploy-network

log:
  level: INFO

accessLog:
  bufferingSize: 100
  fields:
    defaultMode: keep
Traefik is deployed in Swarm as a global service, ensuring one instance runs on every manager node. Because Traefik OSS cannot
reliably share ACME certificate state across replicas, TLS termination is handled at the Open Telekom Cloud Elastic Load Balancer (ELB) instead.
The ELB manages certificates and enforces automatic redirection from HTTP/80 to HTTPS/443, while Traefik itself only receives plain HTTP
traffic on port 80. An alternative would be to use Traefik Enterprise, which supports distributed certificate storage, but it is not
a free open-source product.
Access to Traefik is restricted so that it only accepts requests originating from the VPC subnets and from Open Telekom Cloud infrastructure
IP ranges. For health monitoring, Traefik exposes an endpoint at /ping. This endpoint will be used in the next step when configuring an
ELB listener to track backend health.
Connect to any manager node via SSH, and deploy traefik as a global service:
docker service create \
    --name traefik \
    --mode global \
    --constraint 'node.role==manager' \
    --network dokploy-network \
    --mount type=bind,src=/var/run/docker.sock,dst=/var/run/docker.sock \
    --mount type=bind,src=/mnt/sfs_turbo/traefik.yml,dst=/etc/traefik/traefik.yml,ro \
    --publish mode=host,target=80,published=80,protocol=tcp \
    traefik:v2.10.0 \
        --configFile=/etc/traefik/traefik.yml
Creating Wildcard Certificate
A wildcard certificate is required because the entire platform is designed to expose not just a single control-plane endpoint,
but a dynamic and potentially unbounded set of application domains beneath the same base DNS zone. Dokploy provisions new applications
on the fly and binds them to subdomains such as app1.dokploy.example.com, api.dokploy.example.com, or console.dokploy.example.com.
If you were to use individual certificates for each host, you would have to request, issue, and renew a new certificate every time
an application is deployed, which introduces operational complexity and renewal failures under load.
By using a wildcard certificate for *.dokploy.example.com, the ELB can terminate TLS for any present or future subdomain without having
to be reconfigured. All HTTPS handshakes succeed because the certificate matches the pattern of the hostname, regardless of which application
Traefik forwards the traffic to. This design also separates responsibilities cleanly: the ELB is responsible for presenting a valid chain
of trust to the client, while Traefik only has to handle HTTP routing inside the cluster. Without the wildcard, you would need either
centralized certificate management inside Traefik with distributed ACME storage, which Traefik OSS cannot do safely, or you would be forced
to update the ELB configuration for every new app domain. The wildcard makes the system elastic: new services can be deployed and exposed
under unique subdomains immediately, with no TLS changes, while still maintaining full encryption and trust at the entry point.
If you already have a wildcard certificate for the domain you plan to use, you can skip this step and proceed directly to configuring the ELB listeners.
Deploy the certbot on your workstation:
sudo apt update
sudo apt install -y certbot
We are going to use certbot to issue a TLS certificate for both the base domain dokploy.example.com and every possible subdomain under it
via the wildcard pattern *.dokploy.example.com. Execute the command below, and follow the instructions of the certbot to complete the task:
sudo certbot certonly --manual --preferred-challenges dns -d "*.dokploy.example.com" -d "dokploy.example.com"
at a certain point the certbot will request from you to add a TXT record in DNS, e.g.:
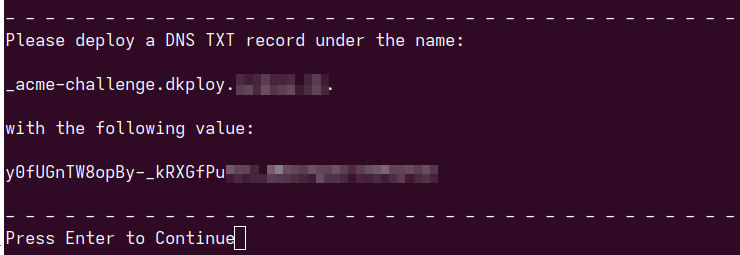
Go to Open Telekom Cloud Console -> Domain Name Service -> Public Zones and select the zone corresponding to the domain through which you will expose Dokploy and the workloads hosted on it. Create a TXT Record by clicking Add Record Set and filling as value the information expected by certbot. Return to the terminal and press Enter to continue.

We this command we are going to obtain a certificate but not install it. Certbot will fetch the cert and place it under /etc/letsencrypt/live/dokploy.example.com, leaving you to configure the load balancer manually.
--manual, instructs Certbot not to use an automated DNS or HTTP plugin, but instead to guide you through the challenge process manually. In this mode it will stop and display TXT records that you must create in your domain’s DNS zone.- -
-preferred-challenges, dns forces certbot to use a DNS-01 challenge. This is required for issuing a wildcard certificate, because Let's Encrypt only allows wildcards to be validated through proving control of the domain via DNS TXT records. -d "*.dokploy.example.com", requests coverage for all subdomains of dokploy.example.com.-d "dokploy.example.com", requests coverage for the apex domain itself, so that both console.dokploy.example.com and the bare dokploy.example.com resolve with a valid certificate.
Certbot will obtain a Let's Encrypt wildcard certificate valid for *.dokploy.example.com and dokploy.example.com, by instructing you to place specific
_acme-challenge TXT records in DNS. Once you prove ownership through DNS, certbot downloads the certificate files, which you can then upload in
Open Telekom Cloud and use in your ELB to terminate TLS for the entire platform.
Go to Open Telekom Cloud Console -> Network Console -> Elastic Load Balancing -> Certificates and click Add Certificate. Name it cert-wildcard-dokploy
and configure it with the following settings and click OK:
- Certificate Type:
Server certificate - Certificate Content: upload /etc/letsencrypt/live/dokploy.example.com/fullchain.pem (or paste directly the contents)
- Private Key: upload /etc/letsencrypt/live/dokploy.example.com/privkey.pem (or paste directly the contents)
- Domain Name:
dkploy.example.com,*.dkploy.example.com
Creating ELB Listeners
Go to Open Telekom Cloud Console -> Network Console -> Elastic Load Balancing -> Load Balancers, select the ELB we created for this lab and click Add Listener.
Name it listener_managers-https and configure it with the following settings:
- Frontend Protocol:
HTTPS - Frontend Port:
443 - SSL Authentication:
One-way authentication - Server Certificate: select
cert-wildcard-dokployfrom the list
click Next: Configure Request Routing Policy, and configure the following:
- Backend Server Group: choose
Create new - Backend server group name:
server_group-managers - Backend Protocol:
HTTP
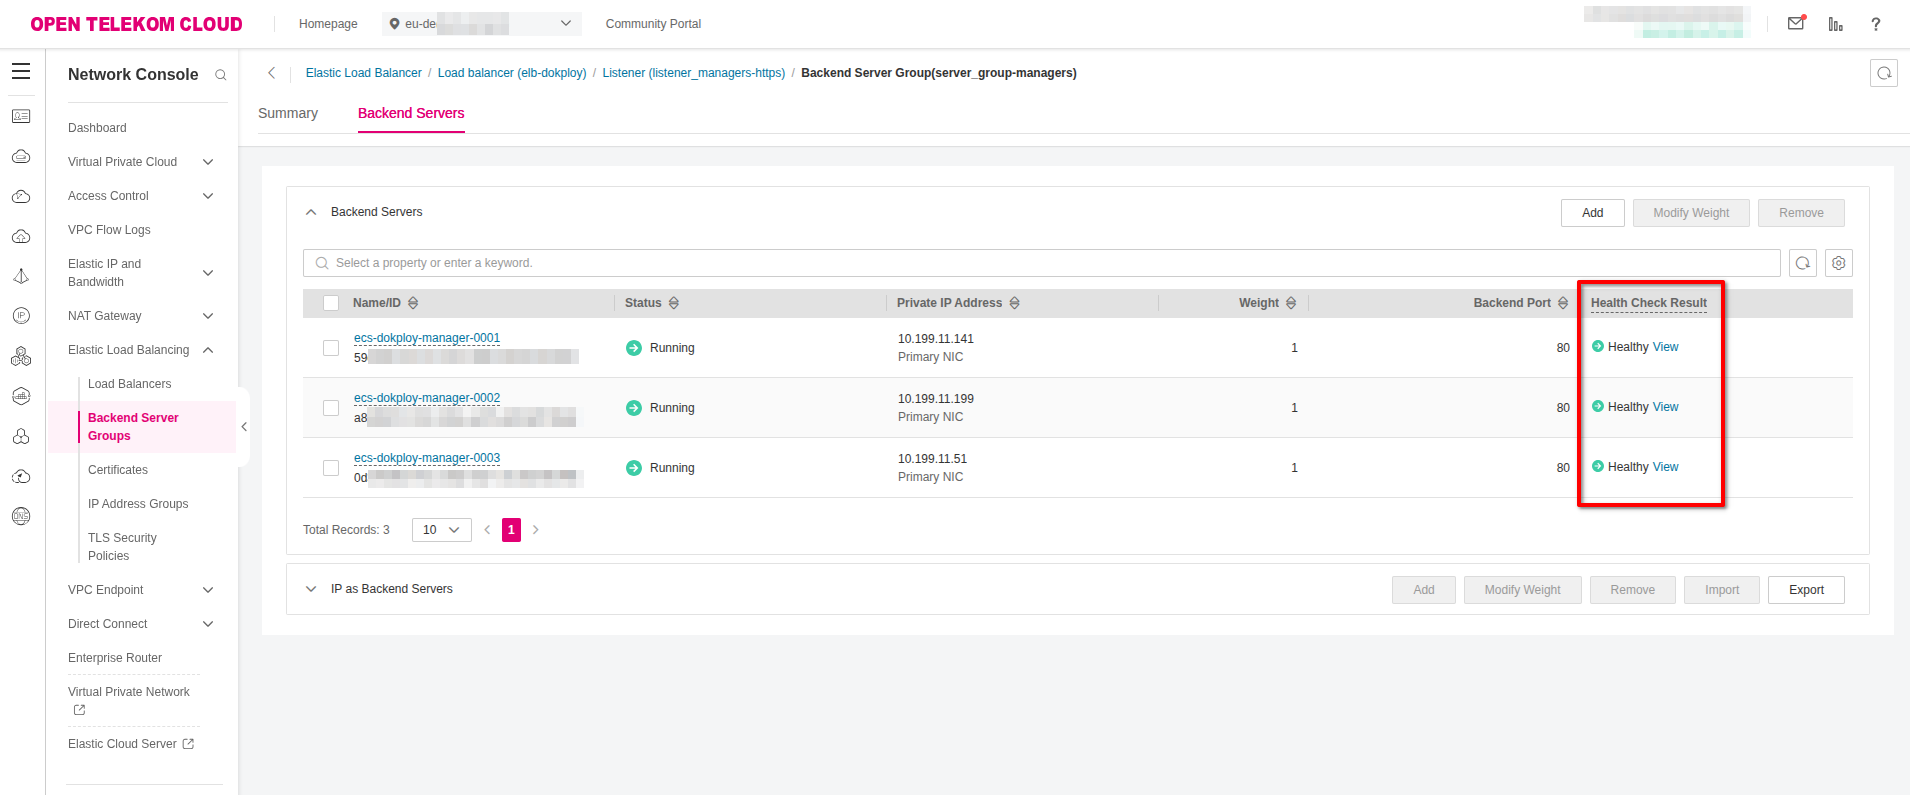
click Next: Add Backend Server -> Add Backend Server, select ALL the manager nodes from the list and set:
- Backend Port:
80 - Weight:
1
click Health Check -> Advanced Settings and set:
- Path:
/ping
and finally Next: Confirm -> Submit.If the configuration above applied correct and Traefik is running in the backgroup as global service, you should see a healthy status for each backend group member after a few seconds:
Go to Open Telekom Cloud Console -> Network Console -> Elastic Load Balancing -> Load Balancers, select the ELB we created for this lab and click Add Listener.
Name it listener_managers-http and configure it with the following settings:
- Frontend Protocol:
HTTP - Frontend Port:
80 - Redirect: ✅
- Redirect: choose
listener_managers-httpsfrom the list
click Next: Confirm -> Submit.

Deploying Portainer (Optional)
Connect to any manager node (preferrably the first) and create a file named portainer-stack.yml in the /mnt/sfs_turbo directory:
version: "3.8"

networks:
  dokploy-network:
    external: true

volumes:
  portainer_data:

services:
  agent:
    image: portainer/agent:2.21.4
    environment:
      - AGENT_CLUSTER_ADDR=tasks.agent
    volumes:
      - /var/run/docker.sock:/var/run/docker.sock
      - /var/lib/docker/volumes:/var/lib/docker/volumes
    networks:
      - dokploy-network
    deploy:
      mode: global
      placement:
        constraints:
          - node.platform.os == linux

  portainer:
    image: portainer/portainer-ce:2.21.4
    command: >
      -H tcp://tasks.agent:9001
      --tlsskipverify
    volumes:
      - portainer_data:/data
    networks:
      - dokploy-network
    deploy:
      replicas: 1
      placement:
        constraints:
          - node.role == manager
      labels:
        traefik.enable: "true"

        # Router
        traefik.http.routers.portainer.rule: Host(`portainer.dokploy.example.com`)
        traefik.http.routers.portainer.entrypoints: web
        traefik.http.routers.portainer.middlewares: portainer-https-hdr

        # Service (backend)
        traefik.http.services.portainer.loadbalancer.server.port: "9000"
        traefik.http.services.portainer.loadbalancer.server.scheme: "http"
        traefik.http.services.portainer.loadbalancer.passHostHeader: "true"

        # Force headers so Portainer knows TLS was at the ELB
        traefik.http.middlewares.portainer-https-hdr.headers.customRequestHeaders.X-Forwarded-Proto: "https"
        traefik.http.middlewares.portainer-https-hdr.headers.customRequestHeaders.X-Forwarded-Port: "443"
        traefik.http.middlewares.portainer-https-hdr.headers.customRequestHeaders.X-Forwarded-Host: "portainer.dokploy.example.com"

        # Make sure Traefik connects over the right overlay network
        traefik.docker.network: "dokploy-network"
and then deploy the stack:
sudo docker stack deploy -c /mnt/sfs_turbo/portainer-stack.yml portainer
Swarm will:
- start one Portainer server on a manager,
- start an agent on every node,
- and Traefik will route https://portainer.dokploy.example.com (ELB -> Traefik :80 -> Portainer :9000).
Open the URL and set the admin password on first login.

Portainer gives a clean, web-based control plane for everything running on Swarm, which dramatically lowers the operational friction of the
platform we just built. Instead of hopping between managers and executing docker commands, we can get real-time visibility of services, tasks,
nodes, networks, volumes, logs, container consoles, and placement/health details when something misbehaves. It integrates with Swarm natively,
so we can deploy and update stacks directly from the UI or from Git, inspect configs and secrets without copying them around, roll back a service
if an update breaks, and confirm constraints and overlay network changes.
In the architecture of this blueprint specifically (where ELB is terminating TLS, Traefik on the managers, and an external overlay for ingress) Portainer sits behind the same Traefik reverse proxy.
Deploying Dokploy
Preparing the Database
Go to Open Telekom Cloud Console -> Relational Database Service. Choose your database, go to Plugins, search the catalog for the pgcrypto plugin, and install it:

Connect to the bastion host using SSH and install the following tools:
sudo apt-get update
sudo apt-get install -y postgresql-client netcat redis-tools
Next we need to initialize our environment variables and create a .pgpass file to simplify future access to the database:
cat > .env <<'EOF'
RDS_HOST="REPLACE_WITH_VALUE"
RDS_PORT="5432"
RDS_USER="root"
RDS_PASSWORD="REPLACE_WITH_VALUE"

REDIS_HOST=REPLACE_WITH_VALUE
REDIS_PORT=6379

TRAEFIK_HOST=console.dokploy.example.com

POSTGRES_HOST=REPLACE_WITH_VALUE
POSTGRES_PORT=5432
POSTGRES_DB=dokploy
POSTGRES_USER=dokploy
EOF

set -a && source .env && set +a
echo "${RDS_HOST}:${RDS_PORT}:*:${RDS_USER}:${RDS_PASSWORD}" > ~/.pgpass && chmod 600 ~/.pgpass
Substitute all instances of REPLACE_WITH_VALUE and TRAEFIK_HOST with the actual values specific to your environment.
Next we are going to create a script that will idempotently create the dokploy role and database, while also ensuring the public schema ownership is correctly assigned. It is designed so it can be re-run safely without causing errors:
#!/usr/bin/env bash
set -euo pipefail

# --- required: RDS connection for the *admin* user (root) ---
: "${RDS_HOST:?set RDS_HOST}"
: "${RDS_PORT:=5432}"
: "${RDS_USER:=root}"

# If your root password is in ~/.pgpass, you don't need RDS_PASSWORD here.

# --- dokploy app db/user ---
: "${POSTGRES_DB:=dokploy}"
: "${POSTGRES_USER:=dokploy}"
# If not provided, autogenerate
DOKPLOY_PASSWORD="${POSTGRES_PASSWORD:-${DOKPLOY_PASSWORD:-}}"
if [[ -z "${DOKPLOY_PASSWORD}" ]]; then
  DOKPLOY_PASSWORD="$(openssl rand -base64 32 | tr -dc 'A-Za-z0-9' | head -c 32)"
fi

# --- update or create .env (idempotent line replace/add) ---
ENV_FILE="${ENV_FILE:-.env}"
touch "$ENV_FILE"
chmod 600 "$ENV_FILE" || true
upsert_env () {
  local key="$1" val="$2"
  if grep -qE "^[# ]*${key}=" "$ENV_FILE"; then
    # replace existing
    sed -i "s|^[# ]*${key}=.*|${key}=${val}|" "$ENV_FILE"
  else
    echo "${key}=${val}" >> "$ENV_FILE"
  fi
}

upsert_env POSTGRES_HOST "${RDS_HOST}"
upsert_env POSTGRES_PORT "${RDS_PORT}"
upsert_env POSTGRES_DB   "${POSTGRES_DB}"
upsert_env POSTGRES_USER "${POSTGRES_USER}"
upsert_env POSTGRES_PASSWORD "${DOKPLOY_PASSWORD}"

echo "Wrote/updated DB values in ${ENV_FILE}"

# --- run SQL (role, db, grants). Creates password only once; keeps it on re-runs. ---
PGPASSFILE="${PGPASSFILE:-$HOME/.pgpass}" \
psql -h "$RDS_HOST" -p "$RDS_PORT" -U "$RDS_USER" -d postgres --set=ON_ERROR_STOP=1 <<SQL
DO \$\$
DECLARE
  role_exists boolean;
  pwd text := \$pw\$${DOKPLOY_PASSWORD}\$pw\$;
BEGIN
  SELECT EXISTS (SELECT 1 FROM pg_roles WHERE rolname = '${POSTGRES_USER}') INTO role_exists;

  IF NOT role_exists THEN
    PERFORM 1 FROM pg_extension WHERE extname = 'pgcrypto';
    IF NOT FOUND THEN
      CREATE EXTENSION IF NOT EXISTS pgcrypto;
    END IF;

    EXECUTE format('CREATE ROLE ${POSTGRES_USER} LOGIN PASSWORD %L', pwd);
    RAISE NOTICE 'DOKPLOY_PASSWORD=%', pwd;
  ELSE
    ALTER ROLE ${POSTGRES_USER} LOGIN;
  END IF;
END
\$\$ LANGUAGE plpgsql;

-- Create DB if missing
SELECT 'CREATE DATABASE ${POSTGRES_DB} OWNER ${POSTGRES_USER}'
WHERE NOT EXISTS (SELECT 1 FROM pg_database WHERE datname = '${POSTGRES_DB}');
\\gexec

-- Ensure ownership if DB existed
SELECT 'ALTER DATABASE ${POSTGRES_DB} OWNER TO ${POSTGRES_USER}'
WHERE EXISTS (SELECT 1 FROM pg_database WHERE datname = '${POSTGRES_DB}');
\\gexec

\\connect ${POSTGRES_DB}

-- We **don't** try to re-own public on RDS (often blocked). Give full rights instead.
GRANT USAGE, CREATE ON SCHEMA public TO ${POSTGRES_USER};
ALTER DEFAULT PRIVILEGES IN SCHEMA public GRANT ALL ON TABLES    TO ${POSTGRES_USER};
ALTER DEFAULT PRIVILEGES IN SCHEMA public GRANT ALL ON SEQUENCES TO ${POSTGRES_USER};
ALTER DEFAULT PRIVILEGES IN SCHEMA public GRANT ALL ON FUNCTIONS TO ${POSTGRES_USER};
SQL

echo "Bootstrap complete. Password saved to ${ENV_FILE} (POSTGRES_PASSWORD)."
and execute the script on the bastion (or whereever you chose to install postgresql-client):
set -a && source .env && set +a

./bootstrap_dokploy.sh
Deploying Dokploy as a Stack
Create a file named dokploy-stack.yml in the /mnt/sfs_turbo directory:
version: "3.8"

networks:
  dokploy-network:
    external: true

services:
  dokploy:
    image: dokploy/dokploy:latest
    environment:
      DATABASE_URL: postgres://${POSTGRES_USER}:${POSTGRES_PASSWORD}@${POSTGRES_HOST}:${POSTGRES_PORT}/${POSTGRES_DB}?sslmode=require&options=-c%20search_path%3Dpublic
      REDIS_HOST: ${REDIS_HOST}
      ADVERTISE_ADDR: "0.0.0.0"
      TRAEFIK_HOST: ${TRAEFIK_HOST}

    volumes:
      - /var/run/docker.sock:/var/run/docker.sock
      - /mnt/sfs_turbo/dokploy:/etc/dokploy
    networks:
      - dokploy-network
    deploy:
      replicas: 1   # start with one replica to let migrations run
      placement:
        constraints:
          - node.role == manager
      update_config:
        order: stop-first
        parallelism: 1
      labels:
        traefik.enable: "true"
        traefik.http.routers.dokploy.rule: Host(`${TRAEFIK_HOST}`)
        traefik.http.routers.dokploy.entrypoints: web
        traefik.http.services.dokploy.loadbalancer.server.port: "3000"
        traefik.http.services.dokploy.loadbalancer.server.scheme: "http"
        traefik.http.services.dokploy.loadbalancer.passHostHeader: "true"
and execute the following on one of the manager nodes:
cd /mnt/sfs_turbo && mkdir dokploy

set -a && source .env && set +a
docker stack deploy -c dokploy-stack.yml dokploy
We start with replicas: 1 to ensure database migrations run safely without conflicts.
Once the service is up and stable, scale up to 3 replicas to take advantage of all manager nodes and provide high availability.
docker service scale dokploy_dokploy=3
Next, open the console URL you set in TRAEFIK_HOST (for example, console.dokploy.example.com) and create the administrative
account for your Dokploy instance:
